

Mini-brioche
By Cat, Sept 2010 (Image, right, from Chef’s Thesaurus)
Brioche is another goodie I learned to make during my French Period (mid ’70s to mid ’80s). Back then, a friend gave me a copy of The Art of Fine Baking by Paula Peck (1), which first introduced me to this wonderful sweet-rich pastry/bread. I bought a medium brioche tin (about 7″ diameter across the top) several small brioche tins (about 3″ diameter across the top). I mixed up roughly half the recipe, and used about half the dough in the medium brioche tin (without a knob on top), and the remainder in the small tins, with the knob. So buttery! I just loved them. This is my Brioche Version I recipe.
Includes: 1. Brioche I; 2. Brioche II; 3. Brioche III See also: 1. Bread Basics (Yeast-Leavened Breads); 2. Bread & Rolls menu; 3. Salmon & Rice Loaf, in Brioche Not long after that, I bought a copy of Simca’s Cuisine, by Simone Beck (2). Simca is one of the authors of Mastering The Art of French Cooking, a cookbook I could not then afford, so I bought the less expensive paperback of Simca’s Cuisine as a starting point. Her book is designed in different menus, and one of them, for a buffet party, featured a baked salmon & rice loaf, wrapped in brioche pastry – a version of coulibiac (6). That recipe for brioche is my Version-II. (The Salmon & Rice Loaf, in Brioche became my most requested dish at parties. I shaped the loaf like a fish, wrapped it with the brioche, then decorated the pastry before baking, using the tip of a spoon to mark the scales and gills, a knife blade to draw the ridges on the tail and fins, and a slice of pimiento-stuffed green olive for an eye.)

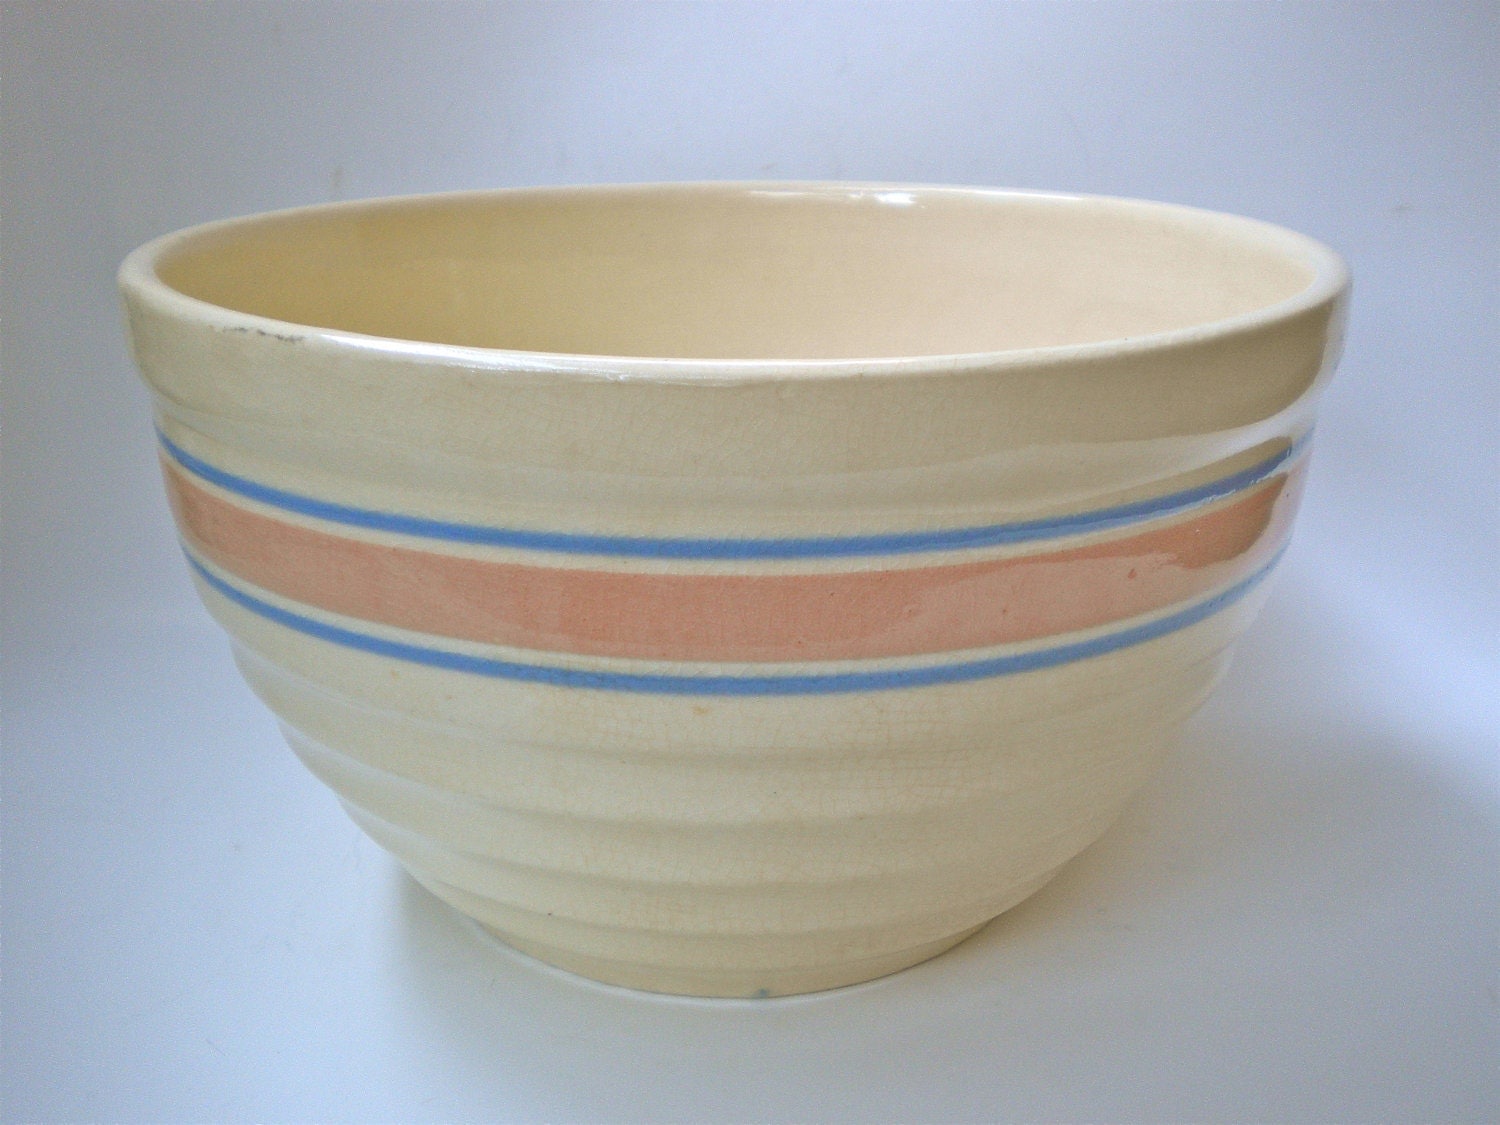
Vintage pottery bread bowl
Back in those older times, I did not own a stand mixer; I used my Dad’s bread-mixing bowl (similar to photo, left, from Etsy (7)) and his wooden spoon to mix the dough. And I still prefer that method. It’s like the difference between driving a car with, or without power steering. You can feel the road (and I believe have better control of the car during bad weather) when you don’t have power steering. When mixing dough, you have a better feel for the hydration and texture of the dough if you mix with a wooden spoon, and even better feel if you mix directly with your hands. The other day, I received a recipe for mini-brioche on Fine Cooking.com (3) and related video (4), which I have not yet tried. It uses a stand mixer, and I’ve not yet adapted it to hand mixing. This is Version-III presented here.
Brioche – Version I
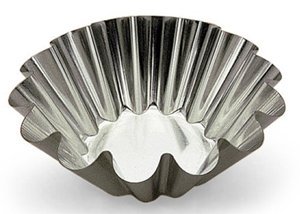
Paderno Tin Brioche Mold
(Photo, right, from Amazon) This is adapted from the recipe in Paula Peck’s book, The Fine Art of Baking (1). This is the richest of the 3 recipes – using 12 egg yolks OR 6 yolks plus 3 whole eggs for 4 – 5 cups flour and 1 cup butter (OR 2 yolks and 2 whole eggs for 2 – 2 ½ cups flour and ½ cup butter, for direct comparison with the other two recipes). And it uses less sugar – about 2 Tbsp for 2 – 2 ½ cups flour. It is a large recipe, and for this reason, I have never tried it, preferring to use Simca’s recipe for ingredient amounts (and substituting ½ cup soft butter for the ½ cup oil), but following Paula’s mixing and shaping instructions.
For comparison purposes only, I’ve modified the ingredients by dividing in half. I do not recommend using this method of making a smaller recipe; instead, use the ingredients of one of the other recipes. I do recommend following the mixing and baking instructions of this recipe.
Ingredients (half of original, for recipe comparison only)
- Dough:
- 2 packages active dry yeast
- 2 Tbsp sugar
- 1 tsp salt
- ⅜ cup warm milk (¼ cup plus 2 Tbsp)
- 6 egg yolks OR 3 – 4 yolks and 1 whole egg OR 2 yolks and 2 whole eggs
- Egg wash:
- 2 – 2 ½ cups pastry flour (soft wheat)
- ½ cup soft butter
- 1 egg yolk
- 1 tsp cream or whole milk
Method
- Proof yeast per directions on package (I dissolve and proof it in the warm milk).
- Add yolks/egg and stir well.
- Add flour, ¼ – ½ cup at a time, mixing roughly after each addition.
- Add butter, about 1 Tbsp at a time, mixing in. Kneading a bit with hand, if needed
- Turn out dough onto board and knead very well – about 10 minutes, until dough is smooth and elastic, adding more flour as needed to make a “medium-firm, satiny dough.”
- First rise: Clean out bowl and dry it well. Place dough in bowl and dust top with flour. Cover, and place in a draft-free, warm spot to rise until doubled in bulk, 30 – 45 minutes.
- Second rise: Punch down thoroughly with floured hand and let rise once more, until almost doubled. If you don’t intend to use it right away, wrap it well and refrigerate until it is needed.
- Preheat oven to 400°F; butter muffin or small brioche tins, or whatever baking pan you wish to use.
- Shape *: instruction is for traditional shape, with a knob on top, using small tins, but you can make other sizes. Cut off egg-size pieces of dough (about 2 oz). Roll into an oval, then use the edge of your hand to crease the dough so that ⅓ is on one side of your hand, and ⅔ is on the other. You want the smaller portion to almost-but-not-quite separate from the larger portion.
- Place into buttered tin with larger portion down and smaller portion on top. Round the smaller portion into a knob, being careful not to separate it from the larger portion. Press it firmly down into the larger portion. It must be firmly settled, or it will tip over as it rises. Repeat with remaining portions of dough.
- Final rise: Let rise until almost to top of tins. Use kitchen shears to trim here and there around the knob so that it will retain its separate shape.
- Bake: Mix egg wash: using a fork or egg whip, beat yolk and cream, then brush over top of brioches. Bake in preheated oven 20 – 25 minutes, or until brioches are a deep golden brown.
- Remove to rack to cool before removing brioche from tin.
* Other shapes:
- The cloverleaf (same as for cloverleaf rolls): Pinch off small pieces of dough and roll into balls. Place 3 balls in bottom of muffin tin. if they won’t rest on bottom, the balls are too big.
- Knots: Roll portions of dough into a snake, then tie into a half-knot, tucking ends underneath
- Buns: Pinch off portion of dough that will fill a muffin tin half-way; roll into a ball and place in buttered muffin tin, or arrange in baking pan with other portions.
- Roll large portion of dough into a log, then bring it around into a large circle – like a doughnut. This will need a longer baking time. After baking, place the circular brioche on a plate and fill center with fruit topped with whipped cream.
- Roll out dough to wrap around a meat entree, such as filet of beef, baked salmon & rice loaf pate or sausage en croute.
Brioche – Version II
This is adapted from Simca’s Cuisine, by Simone Back (2). The original was developed from an experiment by Simca and Julia Child when making croissants. Because they used American flour (as opposed to European flour), they tried adding some oil; this gave a smoother pastry than when no oil was used. Simca then tried using peanut oil for brioche, and this recipe was ‘born.’ Most commercial peanut oil is already rancid in the bottle; choose instead cold-pressed peanut oil. Do not use ‘salad oil’, corn, soy, or canola oil, as these are likely GMO and rancid in the bottle. Cold-pressed safflower oil might work. Olive oil might work for a savory dish, but its flavor is too strong for sweet pastry. So I use soft butter (not margarine). The following makes 1 ½ pounds of dough. This is enough to completely enclose a 4-pound salmon.
2021 update: I’ve since learned about using sprouted grain flour, as the sprouting process partially-breaks down the gluten, so that even those with gluten sensitivity can use it. I would love to try this with sprouted wheat pastry flour or sprouted spelt flour that I pouches from Granite Mill Farms in Trout Creek Montana (8).
Ingredients
- 1 package (2 ¼ tsp) active dry yeast
- 3 ½ cup pastry flour (soft wheat); all-purpose flour can be used in a pinch
- 2 large eggs
- ¾ tsp Unrefined sea salt
- 2 Tbsp Rapadura sugar (for a salted dish), or up to ½ cup sugar (for sweet pastry)
- ½ cup peanut oil (or ½ cup soft butter – my preference)
Method
- Dissolve yeast in ⅓ cup tepid, filtered water. [“tepid” means moderately warm, or lukewarm.]
- Measure flour into mixing bowl and make a well in the center. Beat the eggs in a small bowl or glass measuring cup, then pour into the well along with the salt and sugar. Mix roughly with a fork then add oil, 1 Tbsp at a time, mixing between additions. This goes fairly quickly, about 1 minute total; do not try to mix thoroughly. Add yeast and mix again about 2 minutes to blend in the yeast, switching to a wooden spoon when the fork is overwhelmed.
- Turn out dough onto a board or pastry marble, scraping bowl clean. Knead 5 – 6 minutes, until it has enough elasticity to return to its shape when pulled out.
- Flour a mixing bowl, slide dough into bowl and sprinkle dough with flour. Cut a cross in top of the mound of dough, then cover with a damp towel and let rise in a warm place for 2 – 2 ½ hours, or until doubled in bulk.
- Flour your hand and deflate dough with your palm,, turning the bowl to push the dough down all around.
- Use dough immediately, or wrap tightly in strong paper and then in a cloth, tie it with strings to prevent it from rising again, and refrigerate to use no later than the following day. Or freeze it, then let it defrost in the fridge 5 – 6 hours before using.
Brioche – Version III
This Fine Cooking recipe, originally by Allison Ehri Kreitler (3), bakes the individual brioche in 16 small, 3” fluted brioche pans (à tête), as show in photo above right. See also a Fine Cooking video: how to make mini brioches à tete (4). But of course other pans or even a free-form can be used. This version also uses a stand mixer with paddle and then dough attachment. I would prefer to hand-mix with my wooden spoon. I’ve not tested nor adapted this recipe other than to indicate my ingredient preferences. Makes 16 mini-brioches.
Ingredients
- Dough:
- 18 oz (about 4 cups) unbleached all-purpose flour
- ⅓ cup Rapadura sugar (originally ‘granulated sugar’)
- ½ oz (1 ½ Tbsp) active dry yeast
- 2 tsp Unrefined sea salt, fine-grind (originally ‘table salt’)
- 4 large eggs, room temperature
- 4 oz (½ cup) whole milk* at room temperature
- 8 oz (1 cup) unsalted butter, cut into 16 pieces and slightly softened, plus more for the pans
- Egg Wash:
- 2 large eggs plus 1 large egg yolk
- pinch Unrefined sea salt
- Equipment
- Stand mixer fitted with paddle attachment OR large bowl and wooden spoon
- sturdy rubber spatula
- kneading/shaping surface
- plastic bag large enough to contain your mixing bowl
- 16 each, 3″ brioche tins (3″ to 3 ¼” inches wide across the top and at least 1 ¼” high)
‘*NOTE: if using raw milk, scald it first, then cool to room temperature
Method
- Using a stand mixer: Fit mixer with paddle attachment, mix the flour, sugar, yeast, and salt on low speed until well combined. Add eggs and milk; continue mixing on low speed to combine.
- As soon as the dough starts to clump together, remove the paddle attachment and attach the dough hook. (There will still be unmixed egg and flour in the bowl.) Mix on medium speed for 2 minutes. Scrape the bowl and hook. Continue to mix until the dough is firm and elastic, about 2 minutes more. The dough may stick to the hook at this point, but that’s OK. Scrape the dough off the hook again.
- Increase to medium-low speed; add half of the butter, a few pieces at a time. Scrape down the bowl and dough hook, and remove the dough hook.
- Give the dough a few kneads by hand in the bowl, repeatedly folding the dough over on itself, to help incorporate the butter.
- Reattach the dough hook and add the remaining butter, a few pieces at a time, mixing on medium-low speed.
- Once all of the butter has been added, increase the mixer speed to medium and mix for 4 minutes. Scrape the dough hook and the sides and bottom of the bowl. Mix again until the dough is smooth, soft, and shiny, about 4 minutes more. You’ll hear the dough slap against the sides of the bowl when it’s ready. (If your kitchen is warm, the dough may seem too loose at this point. Resist the urge to add extra flour, or the brioche may be tough.)
- First Rise: Turn dough out onto a clean, very lightly floured work surface. The dough will be very moist. Knead by hand a few times and then form into a ball by folding the sides into the middle at 12, 3, 6, and 9 o’clock. Flip the dough over, place your palms on either side of the dough, and tuck it under itself, turning the dough as you tuck to form a loose ball with a smooth top.
- Transfer the dough, smooth side up, to a clean large bowl, then place bowl in a plastic bag.. Let dough rise in a warm, draft-free spot until doubled in size, about 1 hour.
- Second Rise: Turn the dough out, smooth top down, onto a very lightly floured work surface. Again, form it into a ball using same fold and tuck method as for first rise.
- Transfer dough, smooth side up, back to the bowl, and place again in plastic bag. At this point, for best flavor refrigerate the dough overnight. Or let it sit out until doubled in size, about 1 hour. The warmer the room, the faster the brioche will rise, so keep an eye on it.
- Shape the brioches: If the dough was refrigerated, let it warm to room temperature, about 2 hours.
- Butter brioche tins.
- Turn the dough out, smooth top down, onto a clean work surface. Form dough into a ball using method described above. Divide dough into 2 equal pieces, about 1 lb. 3 oz. each. Divide each half into 8 equal pieces of about 2 ½ oz. each, for a total of 16 pieces of dough. Cover with oiled parchment or the plastic bag to prevent dough from drying out.
- Roll each piece of dough into a tight ball by cupping your hand over the dough and moving it in a circular motion with the fingers of that hand slightly tucked in.
- To form the “tête,” or head, hold your hand perpendicular to the work surface, with your fingers straight and tightly together (like you’re going to do a karate chop). Working with one ball of dough at a time (keeping the others covered):
- Press down onto the ball with the side of your hand about one-third of the way from one of the edges of the dough ball (leaving one-third of the dough to one side of your hand, and two-thirds of the dough to the other side of your hand).
- Saw back and forth with your hand almost all of the way through until you get a shape that looks like a bowling pin, or a head and body connected by a very thin, almost translucent neck.
- Holding the dough by the “head,” turn the dough upright so the body is resting on the work surface. Lower the head down into the body, pressing deeply into the body and spreading it with your thumbs and index fingers to make a nest for the head.
- Tighten the body around the nestled head by tucking and lifting the body up around the head. Gently place the dough in one of the prepared molds, body down. Repeat with the remaining dough. Transfer the molds to a large rimmed baking sheet.
- Proof the brioches
- Cover the brioches very loosely with oiled parchment; alternately, arrange the brioches on a baking sheet and slide a plastic bag over each end of the sheet so all the birches are covered.
- Let the dough rise until almost doubled in size and filling the molds, about 1 hour. It should spring back when gently poked with a finger.
- Meanwhile, position an oven rack in the center of the oven and heat the oven to 375°F. It is important that the oven be thoroughly heated so the brioches bake evenly.
- Bake the brioches:
- Egg wash: In a small bowl, beat the eggs and yolk with a pinch of salt, using a whisk or hand-held mixer.
- Lightly brush the top of the brioches (without letting the egg wash drip down into the molds or pans, which would make the brioches stick to their molds). Place on baking sheet (if not already on one).
- Bake until dark golden-brown on top and golden on the sides (you can lift the brioche slightly to peek in at the edge of the mold), about 18 minutes. (The internal temperature should be 190°F.)
- Remove from oven and cool on a wire rack for 10 minutes before unmolding. Serve while they’re still warm to the touch.
References
- The Art of Fine Baking by Paula Peck (see my page Beloved Cookbooks for more detail)
- Simca’s Cuisine, by Simone Beck (see my page Beloved Cookbooks for more detail)
- Fine Cooking recipe, originally by Allison Ehri Kreitler and Lesli Heffler Flick
- (finecooking.com/recipes/authentic-brioche.aspx)
- Fine Cooking video: how to make mini brioches à tete (finecooking.com/item/14196/audio-slide-show-how-to-make-authentic-brioche)
- Wikipedia, on Coulibiac (en.wikipedia.org/wiki/Coulibiac)
- Etsy, image of bowl (img0.etsystatic.com/000/0/6283669/il_fullxfull.242976172.jpg)
- granitemillfarms.com/products.htm