
Pita
By Cat, Jan 2008 (Photo, right, from Wikimedia Commons)
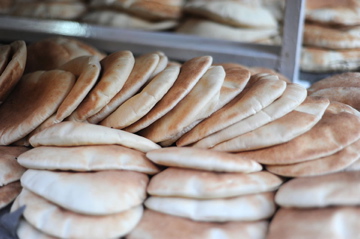
Pita (pronounced PEE-tah), also called ‘pocket bread’ is a staple in all of the eastern Mediterranean countries. Now, if your exposure to Pita is from a bag at Trader Joes, you have not tried the real thing.
Pita is usually round with a pocket in the middle, so you can fill the pocket with meats, veggies, etc, as in a sandwich. It can be made with white or whole wheat flour, or sprouted wheat flour.
There’s a wonderful hole-in-the-wall Lebanese restaurant in Portland OR, called Nicholas (6) that makes pita to order. They bake it right there in their oven; when they bring it to your table, it is steaming and all puffed up like a balloon. As it cools, the balloon collapses. You may have encountered this in other cities, maybe not. There just is nothing as good as this, except perhaps for fresh Lefse – Potato Flatbread from Scandinavia.
- Includes: 1. Whole Wheat Pita
- See also: 1. Lefse – Scandinavian Potato Flatbread; 2. Naan (Traditional Indian Tandoori Flatbread); 3. Breads & Rolls Menu; 4. Flatbreads: Note on Ingredients & Equipment
I prefer whole grain breads, and pita is no exception. I created my recipe based on recipes from four different websites, by comparing ingredients, amounts, and procedure (See below for Comparison of Pita Ingredients). I have not yet tested my recipe. I’m so enamored with my Naan (Traditional Indian Tandoori Flatbread) recipe that I never got around to testing my Pita recipe. I’d like to revise it to a 12-hour (overnight sponge with lemon juice to break down the phytates in the flour, similar to my naan recipe).
Pita is very similar to Naan, in the making, taste and texture. The main difference between them is that naan is made with yogurt, so is softer and more moist; pita just uses water as the liquid, so is drier. Also, naan is usually flavored with coriander or another spice. Both should puff into a balloon, with an air pocket in the middle. However, I cannot get my naan to puff, and I fear I’d have the same trouble with pita.
Notes on Ingredients and Equipment
Refer to Flatbreads: Note on Ingredients & Equipment. Below are some notes specific to pita.
- Flour: Most pita recipes call for bread flour (white or whole wheat); be sure to pick a bread flour that has not been bromated. (For more on flour options, refer to my articles on Wheat Flour (about) and Other True Grain Flour (about). When using whole grain flours, extra moisture is required, as whole grain flours are drier than white.
- Oil: Because Pita is a fairly dry bread, I do not recommend using oil. However, olive oil would be your best choice should you wish to use an oil.
- Water: Use enough filtered water warmed to about 105°F, so that the dough is light and slightly sticky. This ensures enough steam while baking to puff up and form a pocket.
- Oven: Most recipes indicate using the lowest rack position in your oven, but some call for the middle position. In traditional Lebanese ovens, pitas are baked on the oven floor, so I’m of the opinion that the lowest rack position is best (remove other racks).
Most recipes call for a very hot oven (450° to 500°F), which I believe is correct. Others call for a moderate oven (3500F), but the breads are much less likely to puff at this temperature. But, each oven is different, and you must experiment with yours.
- Baking Surface: There is some controversy as to whether you need a Baking Stone. Some claim it provides too much heat all at once and keeps the pitas from puffing. If you choose not to use the stone, use baking sheets or squares of foil (refer to Farmgirl Fare (3) for more on this). Squares of foil make it easier to remove the puffed breads from your oven, but then you risk aluminum leaching into your bread.
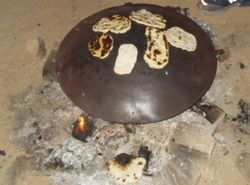
Pita grill over outdoor fire
Instead of using the oven, you could cook your pita on a griddle (photo, left, from Wikimedia commons).
- Pizza Peel: A Pizza Peel comes in handy for placing dough on, and removing the baked pita from the stone or baking sheet. Alternately, you could use a wood lefse spatula.
Whole Wheat Pita Recipe
When I originally wrote this recipe, I followed the instruction of the all whole-wheat recipe from Seeds of Knowledge, but modified the ingredient quantities for a ratio of 2 parts flour to 1 part water. Then I altered the instructions to add half the flour at the sponge stage, and the remaining in part 2 (according to the method from the Vegan Feast Kitchen recipe).
See below for a comparison of ingredients between the four reference recipes.
I’ve not yet tested this recipe, which makes 12 pitas, about 5″ in diameter.
Ingredients:
Sponge
- 1 ½ cup whole wheat bread flour (or regular whole wheat flour)
- 1 – 1 ½ tsp active dry yeast
- 1 – 1 ½ cup warm filtered water (105°F)
- 2 tsp honey
Part 2
- 1 – 2 tsp Unrefined sea salt (or Kosher Salt)
- 1 Tbsp oil (optional)
- ½ cup graham or whole grain flour
- ¾ – 1 cup additional whole wheat bread flour (or regular whole wheat flour)
- unbleached white flour for kneading
- Organic cornmeal for dusting (optional)
Equipment:
- glass measuring cup
- large bowl
- wooden spoon
- rolling pin and wood rolling surface
- clean cotton kitchen towels
- baking sheets
- baking stone (optional)
- pizza peel (optional)
Method (Short Version)
Sponge
- Proof yeast in ½ cup water & honey, 5 min
- Add yeast mix, oil, and ½ cup water to flour in bowl; beat 100 strokes, adding more water if necessary. Cover, let rest 30 min to 2 hours.
Part 2
- Sprinkle salt and oil over the sponge. Add graham/sprouted flour and mix into dough. Add remaining flour ¼ cup at a time, until can be gathered into ball. Don’t add too much flour; the dough should be fairly soft.
- Knead on floured (or oiled) surface til light & elastic, 5 – 6 min. Don’t work in too much flour.
- Cover & rise in oiled bowl 1 – 2 hrs.
- Punch down; divide into 12 pieces; work into balls in hands. Place balls on baking sheet, cover and rest 30 minutes.
- Flatten & roll balls to 5″ circles, ⅛ – ¼ thick. Lay on oiled baking sheets; cover with damp towel & rest 30 min. Preheat oven to 500°F, with baking stone (or baking sheet).
- Bake a few at a time, about 5 minutes on stone, baking sheet or foil squares; don’t let brown.
- Remove and stack on foil sheet; roll up to store. Or remove and cool on rack; store in airtight container.
Method (Detail Version)
- Warm water over pilot light or low heat. Measure ½ cup into a glass measure; add honey and sprinkle yeast on top. Stir slightly and let sit to proof the yeast – until it begins to froth\, about 5 minutes.
- Place 1 ½ cup whole wheat flour in a large bowl. Make a well in the center; pour yeast mixture and another ½ cup warm water into the well. Beat vigorously for 100 strokes with wooden spoon (3 minutes) to form a fairly gooey sponge. Add more warm water if it is not gooey enough. Set sponge in a warm, draft-free place, cover with a damp kitchen towel, and let rest/rise 30 minutes. (You can skip this sponge-rise if you wish, but I think it makes a better-textured dough, and increases the availability of the nutrients in the flour. Increase the yeast to 1 3/4 tsp–one packet–if omitting the sponge).
- After the sponge rise, sprinkle salt and oil over the dough. Add graham/sprouted flour and mix. Then add remaining flour, ¼ cup at a time, stirring until dough leaves side of the bowl and can be gathered into a ball. Don’t add too much flour.
- Turn out onto floured kneading surface, such as a kitchen board. Knead until smooth, about 5 – 6 minutes. Don’t work in too much flour. It should be silky smooth, not hard and tough. You can use a little oil on the board instead of flour to keep it from sticking and to avoid adding too much flour.
- Wipe out bowl and oil lightly. Place ball of dough in bowl, then turn it over, so it is oily on top. Cover with a damp kitchen towel, and place in a dry, draft-free place for 1 to 2 hours, or until doubled in size.
- Punch down and place on lightly floured surface. Divide dough into 12 equal parts (one site shows cutting the dough into equal wedges). If you want larger pitas, divide into fewer pieces. However, the smaller pitas are easier to put into and remove from the oven. Work each portion in the palm of your hands to form a ball, about the size of a tangerine. Place balls on a lightly oiled baking sheet. Allow to rest covered with damp kitchen towel for about 30 minutes.
- Flatten with hand, then roll out each ball into a 5 inch round or oval (if you made fewer balls, the pita will be larger, but should be no more than ¼ inch thick). Thickness is more important than shape. When rolling, try not to stretch the dough (stretching could keep them from puffing in the oven). Roll from the center outward; rotate ¼ turn, and repeat until the right thickness. Place on oiled baking sheets and let rest another 30 minutes.
- Meanwhile, place baking stone or baking sheet on middle rack in cold oven (skip if you are using squares of foil). Then preheat oven to 500°F. Place a few pitas on the stone (or a baking sheet or squares of foil), and bake for about 5 minutes. Do not let them get brown or crispy. The oven heat generates steam in the middle of the pita so that it puffs like a balloon (sometimes, they won’t puff up).
- Remove pitas from stone, baking sheet or foil, and stack on a sheet of foil, then roll up the foil and allow the pitas to cool. Or cool them on a rack where they can collapse as they cool. Store in airtight container (or wrapped and sealed in foil) in refrigerator.
Assembly or Serving Suggestions
- Soften dried out pitas by covering with a moist towel.
- To reheat pitas, stack several in a pile, wrap with foil, and place in a 375°F oven for 10 – 15 minutes (5).
- Dip pitas in humous or other dip
- Cut pitas in half and fill pocket with your choice of goodies
Comparison of Ingredients: 4 Pita Recipes
My research for a whole-grain pita recipe led me to four web recipes, most of which use white flour, and some of which provide excellent photos of the process, as noted:
- Farmgirl Fare (3) includes photos
- The Fresh Loaf (4) includes photos
- Vegan Feast Kitchen (5) includes photos; this is a half-whole wheat recipe
- Seeds of Knowledge (1) all whole-wheat recipe
I created my recipe based on the above list, comparing ingredients, and amounts, as in the following chart:
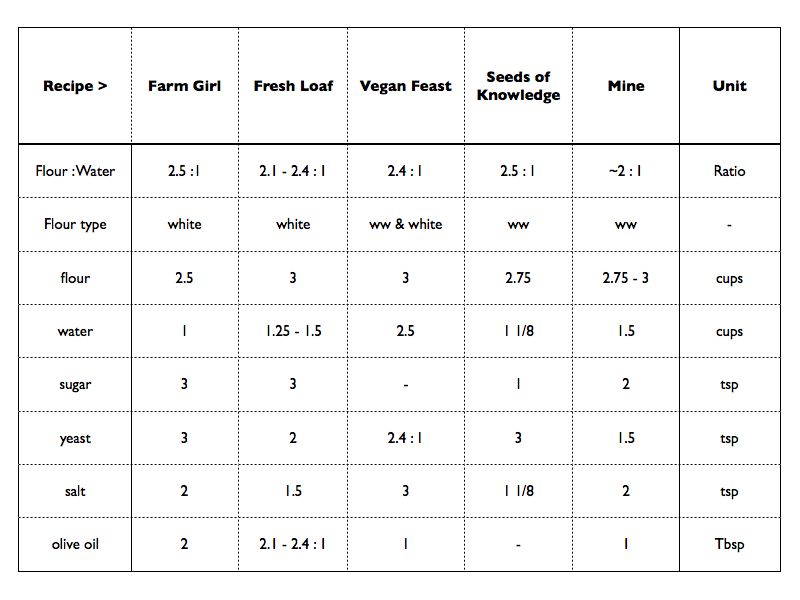
5 Recipes: Comparison of Ingredients
A flour to water ratio greater than 2:1 is perhaps too dry if all whole wheat flour is used; hence my recipe is roughly 1.8:1 to 2:1. For some recipes the sweetener (to feed the yeast during proofing) is sugar and for others it is honey; honey would be more authentic.
I added a sponge-rise to the recipe, based on sponge method Tassajara Bread Book (whereas only the Vegan Feast recipe comes close to a sponge, with a 30 minute rest). I extend this to 2 hours, but would like to test an overnight sponge in the refrigerator (as for Traditional Focaccia (Italian Flatbread)), perhaps using a slightly acidic medium by adding a bit of yogurt, whey or lemon juice.
References:
- seedsofknowledge.com/wholewheat.html
- allrecipes.com/Recipe/Whole-Wheat-Pita-Bread/Detail.aspx
- Farmgirl Fare (foodiefarmgirl.blogspot.com/2005/09/pita-pita-i-too-much-eata.html)
- thefreshloaf.com/recipes/pitabread
- veganfeastkitchen.blogspot.com/2006/08/5-foods-you-have-to-eat-before-you-die.html
- Nicholas Restaurant, Portland OR (nicholasrestaurant.com)
- Tassajara Bread Book by Edward Espe Brown